More than 100,000++ food and drink recipe for help your to complete cooking guide

Recipe of Original Chicken Cordon blue for Vegetarian Recipe

Recipe of Original Chicken Cordon blue for Vegetarian Recipe

Chicken Cordon blue, this is the best recipe ever, So easy to make and maybe this recipe is the ingredient you will ever need. Everyone needs a good recipe and I can't be the only person forever seeing food on my ripe table. Finally I learned to make this recipe, and I will share the secret recipe here with easy, flexible, and yummy!

Chicken Cordon blue

Hey everyone, I hope you are having an amazing day today. Today, I will show you a way to prepare a distinctive dish, chicken cordon blue. One of my favorites. This time, I'm gonna make it a bit tasty. This will be really delicious.

Chicken Cordon blue is one of the most well liked of current trending meals in the world. It's easy, it's quick, it tastes delicious. It is enjoyed by millions every day. They're nice and they look wonderful. Chicken Cordon blue is something that I have loved my whole life.

To begin with this recipe, we must first prepare a few components. You can cook chicken cordon blue using 8 ingredients and 4 steps. Here is how you can achieve that.

The ingredients needed to make Chicken Cordon blue:

  1. Get 6 pcs of chicken breast.
  2. Take slices of ham.
  3. Make ready 100 g of sticks of mozzarella cheese.
  4. Take 2 pcs of whole eggs.
  5. Get 100 g of flour.
  6. Get 200 g of bread crumbs.
  7. Prepare of oil for frying.
  8. Prepare of salt and pepper to taste.

Steps to make Chicken Cordon blue:

  1. Pound the chicken using a meat hammer and lay then on a plastic film, season it with salt and pepper. place the ham in the middle and cheese on top of the ham.
  2. Follow the pictures as shown, after rolling place the chicken roll in the freezer about 30 mins. to set the chicken intact and firm when breading.
  3. Prepare the breading station, and start breading it, it is advisable that you have to chill the breaded chicken first to the freezer about 20 minutes, before frying it in the hot oil..
  4. Set your cooking oil hot and fry the chicken into the golden brown color. After frying place the chicken into the oven to finish cooking it, set your oven to 176F temperature and cook the chicken for 35 mins. After cooking, rest the chicken rolled for a while then cut it the way you like it, serves with any chicken gravy, or any mayonnaise base sauces. ENJOY.

So that's going to wrap it up for this exceptional food chicken cordon blue recipe. Thanks so much for reading. I am sure you can make this at home. There is gonna be more interesting food at home recipes coming up. Don't forget to bookmark this page on your browser, and share it to your loved ones, friends and colleague. Thank you for reading. Go on get cooking!

Recipe of Real Danish pastry for List of Recipe

Recipe of Real Danish pastry for List of Recipe

Danish pastry, Danish Pastry. (Wienerbrød, Wienerbröd, Viennese Bread, Viineri, Facturas, Kopenhagener It is believed that Danish pastry was created by Austrian bakers who were hired in Denmark during the. This is a variation of classic Danish pastry. From this homemade pastry dough you can create a pastry braid or individual breakfast pastries. this is the popular recipe ever, So easy to prepare and maybe this recipe is the ingredient you will ever need. Everyone needs a good recipe and I can't be the only person forever seeing food on my ripe table. Finally I learned to prepare this recipe, and I will share the secret recipe here with easy, flexible, and yummy!

Danish pastry

Maybe some cream cheese, cherry filling, and a flaky dough? "Tourists will come in and ask for the one with cheese, or a salty and savory pastry. Did you ever wonder how artisan bakers make those super-buttery, flaky, light-as-air Danish? Finally, a real Danish dough for making Danish pastries just like the bakery.

Hey everyone, it's Louise, welcome to my recipe site. Today, we're going to prepare a special dish, danish pastry. It is one of my favorites. For mine, I'm gonna make it a little bit tasty. This will be really delicious.

Danish Pastry. (Wienerbrød, Wienerbröd, Viennese Bread, Viineri, Facturas, Kopenhagener It is believed that Danish pastry was created by Austrian bakers who were hired in Denmark during the. This is a variation of classic Danish pastry. From this homemade pastry dough you can create a pastry braid or individual breakfast pastries.

Danish pastry is one of the most popular of current trending foods on earth. It is simple, it's quick, it tastes delicious. It's appreciated by millions every day. They are nice and they look wonderful. Danish pastry is something that I've loved my entire life.

To get started with this recipe, we must first prepare a few ingredients. You can cook danish pastry using 16 ingredients and 16 steps. Here is how you cook it.

The ingredients needed to make Danish pastry:

  1. Make ready of dough.
  2. Take 7 cup of flour.
  3. Prepare cup of 1/8 cup butter (softened).
  4. Take 1/3 cup of milk powder.
  5. Take 1/4 cup of sugar.
  6. Get 1 tsp of salt.
  7. Get 1 tbsp of instant yeast.
  8. Get 2 1/2 cup of cold water.
  9. Take 3 of eggs.
  10. Make ready 1 3/4 cup of foothills shortening and butter (refrigerated) (3/4 lb).
  11. Prepare of egg wash.
  12. Make ready 1 of eggs.
  13. Prepare of vanilla glaze.
  14. Make ready 1 cup of confectioners sugar.
  15. Get 1 tsp of vanilla extract.
  16. Make ready 4 tbsp of milk or water.

This can be used as a base for cheese or fruit Danishes, or elephant ears and bear Danish Pastry. Danish Pastry - the easy way to make Fruit Danish, Pinwheels & other breakfast pastries. Get the shortcut recipe for danish pastry dough that doesn't even have to be kneaded. See more ideas about danish pastry, pastry, food.

Steps to make Danish pastry:

  1. In large bowl rub flour and 1/8 cup softened butter together.
  2. Stir in milk powder, sugar, salt, yeast.
  3. Whisk together eggs and water..
  4. Stir eggs and water into flour mixture until a very sticky dough ball forms..
  5. Roll into a large rectangle (approximately 16x28inches).
  6. Cut shortening/butter into approx 1/4 inch squares and lay on top of dough covering 2/3 of rectangle. Fold dough over in thirds..
  7. Roll out into rectangle (approx 16x28). Fold dough over in thirds. Chill x 15 min covered in fridge. Repeat rolling folding and chilling a total of 3 times..
  8. Cut dough into 4 rectangles. Cover 3 rectangles and place in fridge until ready to use..
  9. Working with one quarter of dough at a time Roll dough into a 6x15 inch rectangle. It is important to keep this rectangle fairly uniform and even. Cut into 12 half inch strips. A ruler and pizza cutter help..
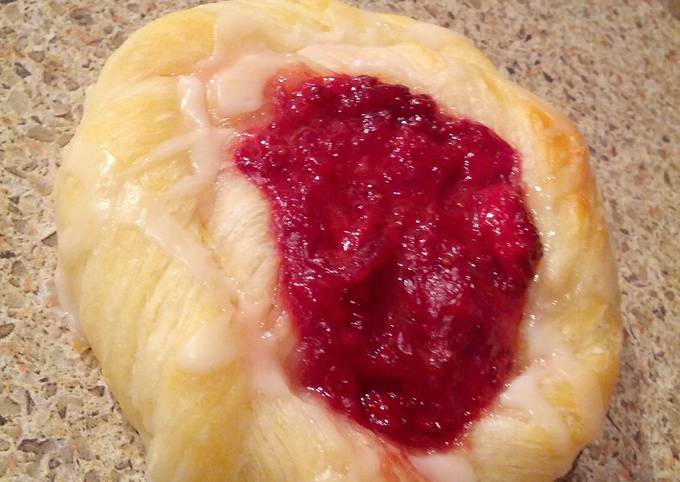
  10. Make into pastries. Twist the dough, shape into circles, tucking the ends under. Use fingers to make an indent in center (for filling). Place on cookie sheet lined with parchment paper..
  11. Let rise (approx 15 min until you can see the dough starting to rise). Can do this step while you start shaping your remaining portions of dough..
  12. Brush with beaten egg (helps brown the dough).
  13. Place filling of choice on danish. (See my raspberry and cream cheese filling recipes for inspiration, or just use jam).
  14. Bake at 400°F for 14-16 min..
  15. Repeat steps 8-13 for remaining 3 quarters of dough..
  16. Make vanilla glaze. Stir together confectioner sugar, vanilla and 2-4 tablespoon water or milk until reaches desired consistency. Drizzle over slightly cooled danishes..

A quick cheese danish made with puffy pastry. Easy for brunches, desserts or just because. Picking the best Danish pastries might be a real challenge as there are numerous choices and all of them look equally delicious. Danish pastry is often referred to in a short form as simply a "Danish." This is a bit of a complicated recipe in terms of the steps to create a pastry dough, but the effort is worth it when you taste the result. These Danish are probably the most popular part of the Danish Pastry family.

So that's going to wrap this up with this exceptional food danish pastry recipe. Thank you very much for reading. I'm sure you will make this at home. There's gonna be interesting food in home recipes coming up. Remember to bookmark this page in your browser, and share it to your loved ones, colleague and friends. Thank you for reading. Go on get cooking!

How to Prepare Fancy Over night soaked fruit cake for Types of Recipe

How to Prepare Fancy Over night soaked fruit cake for Types of Recipe

Over night soaked fruit cake, Speedy Christmas Cake that requires no overnight fruit soaking! An easy fruit cake that's rich with a velvety texture, super moist and full flavoured. Soaking Fruits for a Christmas Cake without alcohol. this is the favored recipe ever, So simple to make and maybe this recipe is the ingredient you will ever need. Everyone needs a good recipe and Finally I learned to prepare this recipe, and I will share the secret recipe here with easy, flexible, and very delicious!

Over night soaked fruit cake

This entire fruit soaking process and Christmas Fruit Cake/Pudding baking can be done in three ways. The third one is the easiest way; soak fruits for overnight just three-four weeks before Christmas and on next day bake the cake, brush alcohol once a week until Christmas. A really moist, rich fruit cake that tastes great and keeps well, ideal for Christmas or any other occasion.

Hello everybody, I hope you're having an amazing day today. Today, we're going to make a distinctive dish, over night soaked fruit cake. One of my favorites food recipes. For mine, I'm gonna make it a little bit tasty. This is gonna smell and look delicious.

Speedy Christmas Cake that requires no overnight fruit soaking! An easy fruit cake that's rich with a velvety texture, super moist and full flavoured. Soaking Fruits for a Christmas Cake without alcohol.

Over night soaked fruit cake is one of the most well liked of recent trending meals on earth. It is easy, it is quick, it tastes yummy. It's enjoyed by millions every day. They're nice and they look fantastic. Over night soaked fruit cake is something which I've loved my entire life.

To get started with this particular recipe, we have to prepare a few ingredients. You can cook over night soaked fruit cake using 8 ingredients and 6 steps. Here is how you can achieve it.

The ingredients needed to make Over night soaked fruit cake:

  1. Get 225 g of plain flour.
  2. Take 225 g of butter.
  3. Make ready 225 g of dark brown sugar.
  4. Prepare 4 of eggs.
  5. Take 2 tsp of cinnamon.
  6. Get 2 tsp of mixed spice.
  7. Get 1 of kilo mixed fruit.
  8. Prepare 750 of fl orange/apple juice (brandy if wish).

Be sure to soak the fruit overnight. Blueberry Overnight Oats: Use fresh or frozen blueberries as the fruit. This light and fruity afternoon treat uses our new National Trust Fairtrade tea; blended exclusively for us in partnership with Clipper. If you leave the fruit to soak overnight this will impart more of the tea flavour to the fruit.

Instructions to make Over night soaked fruit cake:

  1. Measure out all fruit and mixed with fluids. Leave overnight to soak up the liquid and expand the fruit..
  2. Preheat oven to 140 degrees.
  3. Mix flour, sugar, spices, eggs and butter in a large mixing bowl. Mix until smooth.
  4. Slowly add the fruit, mixing as you go..
  5. Transfer the cake into greased tins..
  6. Leave to cook for 4 hours, after look for a spongy top and a clean knife..

DO NOT soak the fruits in a plastic or steel or aluminium container as the alcohol tends to react with these materials. It has to be stored in a glass Jar only. For a non-alcoholic Christmas Fruit Cake, soak your fruits overnight, prior to baking in Orange Juice. Can use any dry fruits you want (dry pineapple. Soaking fruits for a Christmas cake is very simple.

So that is going to wrap it up with this special food over night soaked fruit cake recipe. Thank you very much for your time. I am confident you will make this at home. There is gonna be interesting food at home recipes coming up. Don't forget to save this page in your browser, and share it to your family, colleague and friends. Thank you for reading. Go on get cooking!

Simple Way to Make Exotic Garlic Knots for Healthy Recipe

Simple Way to Make Exotic Garlic Knots for Healthy Recipe

Garlic Knots, this is the popular recipe ever, So simple to make and maybe this recipe is the ingredient you will ever need. Everyone needs a good recipe and I can't be the only person forever seeing food on my ripe table. Finally I learned to prepare this recipe, and I will share the secret recipe here with easy, flexible, and very delicious!

Garlic Knots

Hey everyone, it's Louise, welcome to our recipe page. Today, we're going to prepare a special dish, garlic knots. It is one of my favorites. For mine, I'm gonna make it a little bit unique. This is gonna smell and look delicious.

Garlic Knots is one of the most popular of recent trending foods in the world. It is enjoyed by millions daily. It is simple, it's quick, it tastes yummy. Garlic Knots is something which I have loved my whole life. They are fine and they look wonderful.

To begin with this particular recipe, we have to first prepare a few ingredients. You can have garlic knots using 9 ingredients and 15 steps. Here is how you can achieve it.

The ingredients needed to make Garlic Knots:

  1. Get 1 cup of warm water. Not hot.
  2. Prepare 1 package of active dry yeast.
  3. Make ready 1 teaspoon of sugar.
  4. Get 1 teaspoon of salt.
  5. Get 1/8 teaspoon of garlic powder.
  6. Make ready 1/8 teaspoon of italian seasoning. Can add your favorite spices.
  7. Take 3 cups of bread flour.
  8. Get 2 tablespoons of butter or olive oil.
  9. Prepare of Extra melted butter with garlic and parsley to brush on after.

Instructions to make Garlic Knots:

  1. In a mixer, bread machine or large bowl, combine the yeast, sugar and warm water..
  2. Allow yeast to bloom or become frothy. Usually 5 to 10 minutes.
  3. In separate bowl add flour, salt, spices and mix to combine..
  4. When yeast is frothy, add the butter or olive oil, and flour mixture..
  5. Stir until dough forms. If using mixer use dough hook for about 7 minutes. Bread machine use dough setting..
  6. Turn out onto lightly floured surface and knead 7 to 10 minutes if mixing by hand. The dough should be smooth and elastic..
  7. If dough seems a little sticky, add tablespoon of flour at a time until it no longer sticks. If to dry add water teaspoon at a time until dough is wet but not sticky..
  8. After kneading, place dough in a oiled bowl. Turn to coat. Cover and let rise until double in size..
  9. After dough has doubled, punch down and turn out onto lightly floured surface..
  10. Roll out dough in a rectangle. Try to make it about 1/2 inch thick..
  11. Cut into strips..
  12. Tie strips into large or small knots. Whichever you prefer. Place in oiled pan..
  13. Cover and let rise until double in size..
  14. Bake at 350 degrees for 20 to 30 minutes, or until golden brown..
  15. Brush with melted butter. Garlic butter is fabulous..

So that's going to wrap it up for this special food garlic knots recipe. Thanks so much for your time. I am sure you will make this at home. There's gonna be interesting food in home recipes coming up. Don't forget to save this page in your browser, and share it to your family, colleague and friends. Thank you for reading. Go on get cooking!

Recipe of Iconic Dalgona Whipped Coffee for Healthy Recipe

Recipe of Iconic Dalgona Whipped Coffee for Healthy Recipe

Dalgona Whipped Coffee, this is the best recipe ever, So simple to make and maybe this recipe is the ingredient you will ever need. Everyone needs a good recipe and I can't be the only person forever seeing food on my ripe table. Finally I learned to make this recipe, and I will share the secret recipe here with easy, flexible, and yummy!

Dalgona Whipped Coffee

Hello everybody, it is Brad, welcome to my recipe site. Today, I will show you a way to prepare a special dish, dalgona whipped coffee. One of my favorites food recipes. For mine, I am going to make it a bit unique. This will be really delicious.

Dalgona Whipped Coffee is one of the most popular of current trending meals on earth. It is easy, it's quick, it tastes delicious. It's enjoyed by millions daily. They are nice and they look wonderful. Dalgona Whipped Coffee is something which I've loved my entire life.

To get started with this recipe, we must prepare a few components. You can cook dalgona whipped coffee using 5 ingredients and 2 steps. Here is how you can achieve that.

The ingredients needed to make Dalgona Whipped Coffee:

  1. Make ready 2 tbsp of instant coffee.
  2. Get 2 tbsp of hot water.
  3. Prepare 2 tbsp of white granulated sugar.
  4. Take 1 cup of milk.
  5. Make ready cubes of ice.

Steps to make Dalgona Whipped Coffee:

  1. In a bowl, combine instant coffee, hot water and white sugar. Using a hand mixer, whisk until frothy and thick. This may take around 5 minutes, more or less..
  2. Prepare a glass filled with ice and milk. Top with your whipped coffee. It is ideal to mix it first before drinking..

So that's going to wrap it up with this exceptional food dalgona whipped coffee recipe. Thanks so much for your time. I am confident you will make this at home. There's gonna be interesting food at home recipes coming up. Don't forget to save this page in your browser, and share it to your family, friends and colleague. Thank you for reading. Go on get cooking!

Back To Top